顯示具有 CSS 標籤的文章。 顯示所有文章

2014年10月5日 星期日

[鐵人30天]當ASP.NET MVC 遇見 Angular.js MVC 客戶管理系統(8) - 美化網站工具介紹

* 本篇目標

利用一些 CSS Freamwrok 來快速美化我們的網站

* Bootstrap

開發Web目前Bootstrap已經是必備的技能之一了,甚至ASP.NET網站預設網站也已經全面改用Bootstrap, 如下:

5d07728c23444ba098a1aea2bdc038bb

我們用Nuget升級到目前的版本 3.2.0

139b2fbc829a47b49cedf0aeaf73b249

Bootstrap官網已經寫得很清楚,甚至只要看到順眼的樣式,只要指定個html class,就可把html copy下來,

如前兩天的範例,指定table class="table table-bordered" 就會變成很漂亮的帶框線table

dbd838df68e949c699719e0821b6ede7

f849fdcc41434921890cbf2913456177

其他像input textbox . Button …也只要套個class,就完成美化了,是不是很方便呢!

* Bootstrap主題 – Bootswatch

Bootwatch網站有提供一些免費的主題,讓我們很容易的輕易去更換網站配色,當然可以去買一些付費的template,如Wrapbootstrap,花幾百塊台幣就可以買到一個很完整的網站版型。接下來介紹一下怎麼使用Bootwatch的免費版型來更改樣網站配色。

點選bootstrap.min.css

bdd16d9182414c9cabdd0d4e7315b49d

點開後應該是一大串的css code,我們把這些貼回專案裡bootstrap.min.css

bdd16d9182414c9cabdd0d4e7315b49d

再將選單文字修改一下,這樣很輕鬆就更換配色了!

1033a6d9670648f19f5957faab6cdbc5

* Font Awesome

在以往一些圖示,我們都要設計師做一些ICON,但這個會有一些問題,如設計師死不給(有可能發生)造成時程Delay,或者是ICON大小要做修改,造成失真要重做。Font Awesome是一種以文字呈現圖形的服務,且他跟向量圖一樣是不會隨著大小而失真的,我們一樣使用html標籤 + class 就可以顯示ICON了,且他提供的圖片,我想是非常夠用的。

一樣用Nuget安裝 (有沒有覺得Nuget真的很強大...)

be8a320b748645dfa59ce4fe20424cdd

於Layout.cshtml載入.css

fcbcd99635ed484bb3cd9cfe05c3e769

接著去官網找合適的ICON

fdc0cd573189464f9900643eedb69d8a

套進class,並使用NG的ng-show來判斷是不是像WebAPI取得資料中,來顯示讀取中圖示

c3054489a4f249cdb5941ae21d643e57

完成圖

d36ee5bc7b3e444a9ad8338e4986d2d7

* 後記

現代化開發網站已經有很多工具能幫助我們快速開發了,Devopler通常對UI比較沒有概念,另一個就是某些網頁設計師對css html可能還不是那麼熟悉,用一些工具切出來的版會發生可怕(以前受過table包table網頁版的折磨),現在的話,我會用bootstrap來跟設計師討論,因為bootstrap Responsive Web Design (RWD)是做得非常好的,手機網頁看都會自動變成很好閱讀,故設計師主要會做客製化圖片的部分。接下來後面文章都會利用這些工具來製作我們的網站。

最後介紹一個工具 - placehold.it ,一個很方便的網站服務,當我們與設計師討論好某個區塊圖片向素大小為多少時,我們就可以用指定大小的方式來產生圖片,如:

http://placehold.it/350x150

http://placehold.it/50x50

這樣就可以指定於Img標籤,讓我們先有網站大概的版型樣子,不用等設計師設計出來

<img src=’http://placehold.it/350x150’/>

350x150


本系列程式原始碼請至我的Github下載  https://github.com/kyleap

** 如內容有誤請告知,將進行修改,謝謝 **

2013年12月27日 星期五

KendoUI & ASP.NET MVC系列文章 - 處理CRUD-繼續完成新增、修改、刪除

前言

再前一篇我們已經完成利用Ajax來讀取後端資料顯示於Grid,而此篇就會將新增、修改、刪除功能接續完成

CRUD的 Create - 新增

Controller

利用原本樣板產生的程式做一些修改,原本程式如下

image

將上面程式修改為以下,透過MVC的Model Bindder可以接收前端傳來的Customers物件,並依情況回傳是否新增成功

image

View

將dataSrc新增一個Create function,指向後端的CreateCustomer,並在完成後alert處理結果

 image

Schema部分新增model定義,讓KendoUI知道你的模組結構,並且可設定一些欄位驗證

image

接著在屬性部分新增toolbar及editable,editable模式可分為inline(直接在Gird新增一個)或者是popup(彈跳視窗)方式,此例我們希望新增時是跳出一個燈箱視窗

image

結果圖

這樣就完成,在以往我們可能自己要實做View的頁面,現在KendoUI都幫你做好好的,且表單也排得很整理 lol

image


CRUD的Update-編輯

Controller

基本上跟新增大同小異,我們在Controller新增EditCustomer的JsonResult

image 

View

新增一個Update function

image

在columns多一個command成員,並設定edit按鈕(這邊也可以自訂義Button標籤)

image

這樣就完成編輯燈箱視窗了!!

image

CRUD的Delete-刪除

Contoller (這邊就不解釋了)

image

View

image

image

後記

以上是一種實做CRUD的方式,但其實做法有很多種,譬如你也可自訂新增、編輯的View去實做,或者你也可以自訂一些查詢欄位POST到後端去,關於版面,如果要修改中文的顯示其實也可以做到,之後也會分享一些實做心得PO上來。而下一篇,預計完將後端改成用WebAPI + OData的方式實做 =V=

完成程式碼

Contoller

public class GridAjaxController : Controller
{
private NorthwindEntities db = new NorthwindEntities();

// GET: /GridAjax/
public ActionResult Index()
{
return View();
}

public JsonResult GetCustomer(KendoGridRequest request)
{
try
{
var result = db.Customers.ToList();
return Json(new KendoGrid<Customers>(request, result), JsonRequestBehavior.AllowGet);
}
catch (Exception)
{
Dictionary<string, object> error = new Dictionary<string, object>();
error.Add("ErrorCode", -1);
error.Add("ErrorMessage", "讀取資料失敗!");
return Json(error);
}
}

// GET: /GridAjax/Details/5
public ActionResult Details(string id)
{
if (id == null)
{
return new HttpStatusCodeResult(HttpStatusCode.BadRequest);
}
Customers customers = db.Customers.Find(id);
if (customers == null)
{
return HttpNotFound();
}
return View(customers);
}

// GET: /GridAjax/Create
public ActionResult Create()
{
return View();
}

[AcceptVerbs(HttpVerbs.Post)]
public JsonResult CreateCustomer(Customers customers)
{
if (ModelState.IsValid)
{
if (TryUpdateModel(customers))
{
db.Customers.Add(customers);
db.SaveChanges();
return Json("新增成功!!");
}
}
return Json("新增失敗!!");
}

public JsonResult EditCustomer(Customers customers)
{
if (ModelState.IsValid)
{
db.Entry(customers).State = EntityState.Modified;
if (TryUpdateModel(customers))
{
db.SaveChanges();
return Json("更新成功!!");
}
}
return Json("更新失敗!!");
}

[AcceptVerbs(HttpVerbs.Post)]
public JsonResult DeleteCustomer(string CustomerID)
{
Customers customers = db.Customers.Find(CustomerID);
db.Customers.Remove(customers);
if (TryUpdateModel(customers))
{
db.SaveChanges();
return Json("刪除成功!!");
}
return Json("刪除失敗!!");
}

protected override void Dispose(bool disposing)
{
if (disposing)
{
db.Dispose();
}
base.Dispose(disposing);
}
}

View

@model IEnumerable<KendoUI.Model.Customers>

@{
ViewBag.Title = "Index";
Layout = "~/Views/Shared/BaseLayoutPage.cshtml";
}

@section scripts
{
<script type="text/javascript">
$(function () {

//資料來源物件改用Ajax
var dataSrc = new kendo.data.DataSource({
transport: {
read: {
type: "POST",
url: "/GridAjax/GetCustomer",
dataType: "json",
complete: function (response, status) {
if (response.responseJSON.ErrorCode == -1) {
alert(response.responseJSON.ErrorMessage);
}
}

},
update: {
url: "/GridAjax/EditCustomer",
dataType: "json",
type: "POST",
complete: function (response, status) {
alert(response.responseJSON);
}
},
create: {
url: "/GridAjax/CreateCustomer",
dataType: "json",
type: "POST",
complete: function (response, status) {
alert(response.responseJSON);
}
},
destroy: {
url: "/GridAjax/DeleteCustomer",
dataType: "json",
type: "POST",
complete: function (response, status) {
alert(response.responseJSON);
}
},
},
schema: {
data: function (d) {
return d.data;
},
total: function (d) { return d.total; },
model: {
id: "CustomerID",
fields: {
product: { editable: false, nullable: false },
CompanyName: { validation: { required: true } },
ContactName: { validation: { required: true } },
City: { validation: { required: true } }
}
}
},
pageSize: 5,
serverPaging: true,
serverSorting: true
});

$("#gridData").kendoGrid({
dataSource: dataSrc,
columns: [
{ field: "CustomerID", title: "CustomerID" },
{ field: "CompanyName", title: "CompanyName" },
{ field: "ContactName", title: "ContactName" },
{ field: "City", title: "City" },
{ command: ["edit","destroy"], title: "&nbsp;", width: "160px" }
], //columns的field對應到customer資料表的欄位
sortable: true,
pageable: true,
filterable: true,
width: 800,
toolbar: ["create"],
editable: {
mode: "popup", //使用Popup的模式編輯資料
update: true, // 若設定為True,當按下Update才server資料
}
});
});
</script>
}
<div id="gridData"></div>


延伸閱讀


2013年12月23日 星期一

KendoUI & ASP.NET MVC系列文章 - 基本的Grid功能

前言

在上一篇我們介紹了開發KendoUI相關的準備工作後,這篇將會介紹網頁開發上最為常見的Grid功能,而此篇的目的希望使用MVC的View,來介紹KendoUI Grid的幾個好用功能。

建立MVC的View (如已熟悉可跳過此區塊)

在ASP.NET Webform我們有Master Page的頁面,用來放一些共用的Html(如header或footer),及一些共用的.js、.css檔,而在ASP.NET MVC我們所使用的為Layout Page,找到View裡面的Shared資料夾,點選右鍵加入新項目,選擇Layout Page並修改名稱為BaseLayoutPage.cshtml

image

接下來我們在這個共用的Layout載入KendoUI,載入的檔案在上一篇已經提過,而RenderSection可以把他想成是我們"挖的洞",如我新增了一個scripts的洞,目的就是讓使用此Layout的頁面,能在這個洞坑裡面寫一些JavaScript。

<!DOCTYPE html>

<html>
<head>
<meta name="viewport" content="width=device-width" />
<title>@ViewBag.Title</title>
@Styles.Render("~/Content/kendo/2013.3.1119/kendo.common.min.css")
@Styles.Render("~/Content/kendo/2013.3.1119/kendo.bootstrap.min.css")
@Scripts.Render("~/Scripts/jquery-1.10.2.min.js")
@Scripts.Render("~/Scripts/kendo/2013.3.1119/kendo.web.min.js")
@RenderSection("scripts", required: false)
</head>
<body>
<div>
@RenderBody()
</div>
</body>
</html>


接著我們到Controller資料夾,點選加入控制器,新增一個空白的Controller,此例命名為BaseController


image


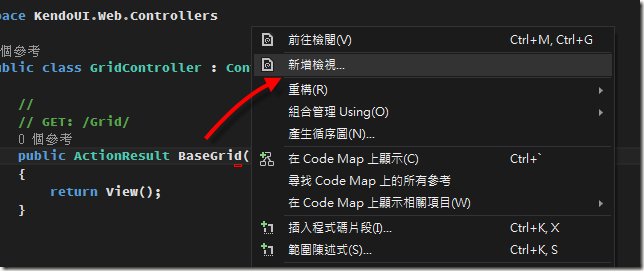
將ActionResult重新命名為BaseGrid,點選新增檢視


image


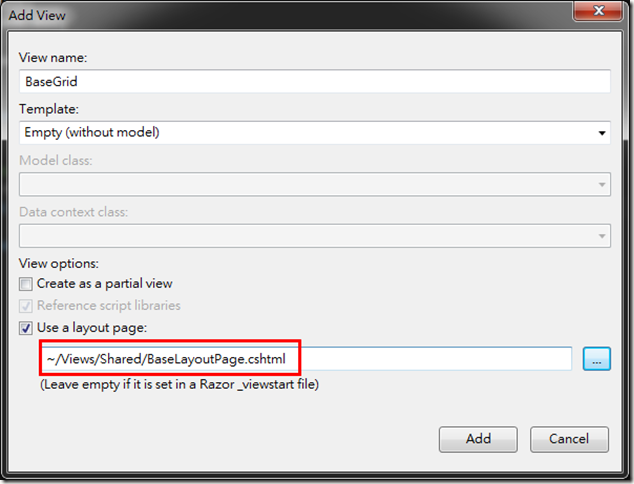
Layout Page記得選擇我們剛剛建的BaseLayoutPage.cshtml

image


如此我們就建立了一個View了,下個段落將開始實做KendoUI的Grid!


image


建立KendoUI Grid的資料繫結


此篇重點會在介紹Grid的基本功能及屬性,故不會使用到MVC的Model,故我會載入一個.js檔來當資料來源


而打開這個.js檔,主要就是定義一個products的物件

var products = [{
ProductID: 1,
ProductName: "Chai",
SupplierID: 1,
CategoryID: 1,
QuantityPerUnit: "10 boxes x 20 bags",
UnitPrice: 18.0000,
UnitsInStock: 39,
UnitsOnOrder: 0,
ReorderLevel: 10,
Discontinued: false,
Category: {
CategoryID: 1,
CategoryName: "Beverages",
Description: "Soft drinks, coffees, teas, beers, and ales"
}
}

接著我們在html新增一個div標籤,ID命名為gridData

<div id="gridData"></div>

接著在剛剛挖的scripts區塊加入以下程式碼,就可以完成Grid的資料繫結了,對我來講,這些程式碼的功能和屬性設置方式並不會很難懂,故上手其實蠻容易的,且對於欄位的設定,還能針對價錢做格式的轉換,不用在程式另外處理。

@section scripts
{
<script src="~/Scripts/products.js"></script>
<script type="text/javascript">
$(function () {
//建立資料來源
var dataSrc = new kendo.data.DataSource({
data: products, //指定products.js的products陣列
schema: {
model: {
fields: {
ProductName: { type: "string" },
UnitPrice: { type: "number" },
UnitsInStock: { type: "number" },
Discontinued: { type: "boolean" }
}
}
},
pageSize: 20 //每筆顯示頁數設定為20
});

$("#gridData").kendoGrid({
//Grid的屬性及功能設置都可加在以下程式區塊
dataSource: dataSrc,
height: 500,
pageable: {
input: true,
numeric: false
},//分頁導覽顯示
columns: [
"ProductName",
{ field: "UnitPrice", title: "Unit Price", format: "{0:c}", width: "130px" },
{ field: "UnitsInStock", title: "Units In Stock", width: "130px" },
{ field: "Discontinued", width: "130px" }
]
});
});
</script>
}

image


KendoUI Grid功能介紹


KendoUI Grid提供的功能非常多,以下介紹幾個我覺得不錯的功能,會發現以往要另外寫程式處理的功能,現在只要指定一個屬性就可完成了 lol


詳細可搭配此API文件的Configuration去設定http://docs.kendoui.com/api/web/grid

filterable: true (欄位篩選)
image 
sortable: true (欄位排序)
image 
selectable: true (選取某列)
image 


resizable: true (欄位寬度拖曳)

groupable: true (欄位群組分類)
image 

其他小技巧


Grid在很多頁面都會使用到時,不仿將基本的設置移至VS的工具箱,下次使用時直接拖拉即可


1


後記


這兩篇我們都沒寫到什麼程式  囧 !! 主要都在KendoUI Grid的基本功能,而再來的幾篇,我們將會實做搭配後端Model做為資料來源,漸漸的完成實務上碰到的情況。


參考資料


http://demos.kendoui.com/web/overview/index.html

2013年12月22日 星期日

KendoUI & ASP.NET MVC系列文章 - 在Visual Studio安裝及更換主題

前言

此篇主要介紹在Visual Studio如何用Nuget安裝KendUI Freamwork及如何更換主題

下載與安裝

在專案上點右鍵,選擇管理Nuget套件

image

選擇線上分類,輸入kendoui,點選安裝

image

安裝完後,在MVC的專案,content(.css)和Scripts(.js)資料夾會多出Kendo資料夾,底下會有版號的資料夾名稱

image

載入方式

如果是純html,可以在<head></head>標籤內載入以下檔案

image

接著我們在html新增一個input標籤,實做KendoUI的日期選擇器

image

並加入以下JavaScript

image

這樣就完成基本的日期選擇器了

image

更換主題

KendoUI有另一個很吸引我的另一點是他有非常多的主題可以更換,且每個主題配色都蠻舒服的

image (圖片截取自官網)

而我們要切換主題,其實只要載入不同的css即可

image

如此就變成bootstrap主題了!

image

自訂主題

如果提供的主題與系統配色不合,對自己配色有信心,KendoUI也有提供很方便的Theme Builders,可以客製化你的主題檔

image

調整完後可以點選Get CSS,將所有程式碼貼回你的.css檔(建議是另外新增一個.css)

image

讓Visual Studio看懂KendoUI intellisense

如果不是用Nuget,而是用手動加入.css或.js的方式,可能Visual Studio不會有Intellisense(智慧提示功能)

image

解決方式是打開Scripts底下的_references.js檔案,將KendoUI Scripts路徑參考進去

image

後續

此篇主要簡單介紹開發前的準備,接下來幾篇文章,主要針對最常用的Grid來介紹!