顯示具有 JSON 標籤的文章。 顯示所有文章

2014年10月3日 星期五

[鐵人30天]當ASP.NET MVC 遇見 Angular.js MVC 客戶管理系統(6) - 取得WebAPI資料

* 本篇目標

建置一個RESTful風格的Web服務

* Web API 2.2

現在開發通常會考慮到多平台,如手機平板等等,但關於資料來源不可能針對每個平台都去寫一樣的Code,早期.NET解決方案有Web Service、WCF Service的應用,.NET Freamwork 4.5後推出了更輕量化的Web API服務,搭配MVC架構開發上變得非常的輕鬆,本系列文章使用Web API 2.2。

延伸閱讀  [Web API] 初探 Web API 筆記

* 建置Web API

我們再UI層新增Web專案時,其實就已經勾選安裝Web API了,如果忘記選擇了,可以透過Nuget安裝。

a8dcf173f2614837b442e02a913799a9

WebAPI開發習慣,我通常會再專案底下建一個API資料夾,接著點選右鍵,加入Web API控制器

f247eb1d2af848babad98b146db3126a

建立以後,她預設會幫我們建立CRUD function,我們就針對每個function去改寫,注意Web API也是MVC架構,命名也是為Controller結尾,但不同的是Web API是繼承ApiController。

9c6601b5d9a54583bdc1d37aab8aae37

接下來我們將Get稍作修改,向BLL層要客戶資料,HttpReponseMessage可以很方便的讓前端知道是否有發生錯誤,並回傳自己定義的Object。

7b24c666c2444fae98ab71461d75553d

接著在瀏覽器執行,輸入 host/api/Customer即可取得我們的資料

a109f7e377e44ef48a866cb63d5a45ad

* 於MVC的Controller及View列出資料

接著我們再專案裡Contoller,新增一個CustomerController

e7bede476978464188a15b911f382cc7

在Controller使用WebClinet像Web API要資料

3dded709ab774d879f9ecd1cf1d1df83

在新增一個View,套入原本樣板的主體Layout

b47227cee9764b49a4fcc1a2ebd5c62b

使用ViewModel,並用好用的Razor語法印出資料

39321e5640db412282e6ee4a0567e661

結果畫面

8dc19f6dfc0745b28cd4d067c85db1f5

* 後記

我認為Web API是個趨勢,未來我也一定會採用這種架構,一方面MVC的Contoller不會有太多跟BLL Service溝通的code,且對於多專案平台,都可向WebAPI取得資料。但實務上我並不會將跟Web API的Code寫在Controller裡,而會是在前端的View,也就是Angular.js登場的時候了!

延伸閱讀ASP.NET MVC - 第一個Web API,Hello Web API

ASP.NET WEB API 心得筆記 (4) WEB API ROUTING

MSDN – MVC Razor語法


本系列程式原始碼請至我的Github下載  https://github.com/kyleap

** 如內容有誤請告知,將進行修改,謝謝 **

2014年1月25日 星期六

Html5 Storage使用心得與應用

前言

大概半年前,開始接觸到Html5相關技術,但其實沒有太深入在實務上使用過,因為html5常常需要新的瀏覽器支援,故舊版IE支援度就差,瀏覽器的支援度可以到html5 Test網站去測試,而如果用IE8執行,除了看到46分被當掉的分數外,也許你會好奇這46分是哪來的,那時就發現了Storage這個東西,並一直找機會想在實務上用看看,故此篇主要會將一些實務範例做分享。

image
(圖為IE8 html的考試卷)


Html5 Storage的基本介紹

我試著用最簡化的方式來介紹html Storage,當然你想更了解html的機制,可以再延伸去Google或者去參考下面的延伸閱讀。
以往我們要暫存資料可能會選擇Session或者是Cookie,而這兩者其實都跟伺服器端有關聯,Storage是一個純客戶端的新機制,他能儲存的資料大小比Cookie還要大(試瀏覽器而定,Cookie大約4KB,而html5 Storage能到5MB)
Storage又分為兩種:Session Storage和Local Storage,主要差別在生命週期的不同
  • Session Storage : 只要該頁面關閉,則Session Storage的生命週期即結束
  • Local Storage : 相反的,Local Storage在使用者清除瀏覽器資料生命週期才會消失


一些範例與應用

以下就介紹我的實務上的應用,也許不是使用的很恰當,或者是有更好的解法,但這篇的目的是讓大家在想Solutions時能想到有html5 Storage能應用。

紀錄div顯示隱藏的狀態

有時表單程式在使用者點選上一頁後,會因為瀏覽器的特性將某些欄位回到初始值狀態,例如下面的例子,我們在下拉式選單選擇其他,會顯示出一個textarea讓他輸入,這時我們就可以寫入Storage來儲存這個div目前應該是隱藏還是顯示。
http://jsfiddle.net/kyleshen/H2pse/
$('#ddlSkills').change(function(){
    if($(this).val() == 'Others') {
        sessionStorage.setItem('ShowOthers', "Y");
        $('#divOthers').show();
    }
    else {
        sessionStorage.setItem('ShowOthers', "N");
        $('#divOthers').hide();
    }
});

$(function(){ 
    //如果SessionStorage為Y時,秀出textarea
    if (sessionStorage.getItem("ShowOthers") == "Y") {
        $('#divOthers').show();
    }
});

會這樣做的原因是之前公司的複雜表單,會針對不同的條件狀態下,顯示不同的區塊及帶入不同的下拉選項或Radio選項,在Submit過後,會顯示出再一次確認表單資訊的訊息,如發現有錯則點選上一頁,這時要保存他所輸入的資訊不讓他重新輸入,那時候就用Session Storage來解決了 !

將Json資料儲存於Session Storage


現在前端技術越來越火紅,有時我們常常會使用一些前端的Gird框架來實作,如JQueryUI、EasyUI、KendoUI…等等,而這些框架多半都使用JSON來接收及傳遞資料。

假設如果Grid我們要獲取目前所勾選的Row資料,這些框架也能很輕鬆的獲取這些項目的JSON string,但如果要將這些項目傳遞到另一頁做處理呢 ? 你也許可以用QueryString將JSON字串當參數傳遞過去,但QueryString是有長度限制的,或者你可以將這些Row的PK,用QueryString傳遞,到該頁時再去DataBase撈取資料也是一個方法,但這樣又多一個Connection。故之前我是將這串JSON String存到Session Storage,即使在操作上換頁也可將這筆資料擷取出來繼續使用。

http://jsfiddle.net/kyleshen/72Qkm/
$(function(){ 
    //新增資料到陣列
    var Skills = new Array();
    Skills.push('C#');
    Skills.push('ASP.NET');
    Skills.push('JQuery');
    
    var Json = JSON.stringify(Skills);
    sessionStorage.setItem('JsonStr', Json);
    $('#DivJson').html(Json); //秀出Json字串的Div
    
});

後記


基本上有了這個儲存機制,可以解決的事情還蠻多的,這邊只是簡單舉例一些小小的應用方式,特別要注意的是,儲存的資料勢必要考慮是不是敏感性資料,畢竟是儲存於客戶端,其實用瀏覽器工具就能看到值並且做竄改,以Chome為例,就是案F12,使用開發者工具視窗,到Resources就能看到key跟Value,點兩下就能改變他的值。Storage已經被很多網站所使用,下次逛網站時,不如打開開發者工具看看那些大網站怎麼應用,並儲存那些資訊吧!

image

延伸閱讀

2013年12月27日 星期五

KendoUI & ASP.NET MVC系列文章 - 處理CRUD-繼續完成新增、修改、刪除

前言

再前一篇我們已經完成利用Ajax來讀取後端資料顯示於Grid,而此篇就會將新增、修改、刪除功能接續完成

CRUD的 Create - 新增

Controller

利用原本樣板產生的程式做一些修改,原本程式如下

image

將上面程式修改為以下,透過MVC的Model Bindder可以接收前端傳來的Customers物件,並依情況回傳是否新增成功

image

View

將dataSrc新增一個Create function,指向後端的CreateCustomer,並在完成後alert處理結果

 image

Schema部分新增model定義,讓KendoUI知道你的模組結構,並且可設定一些欄位驗證

image

接著在屬性部分新增toolbar及editable,editable模式可分為inline(直接在Gird新增一個)或者是popup(彈跳視窗)方式,此例我們希望新增時是跳出一個燈箱視窗

image

結果圖

這樣就完成,在以往我們可能自己要實做View的頁面,現在KendoUI都幫你做好好的,且表單也排得很整理 lol

image


CRUD的Update-編輯

Controller

基本上跟新增大同小異,我們在Controller新增EditCustomer的JsonResult

image 

View

新增一個Update function

image

在columns多一個command成員,並設定edit按鈕(這邊也可以自訂義Button標籤)

image

這樣就完成編輯燈箱視窗了!!

image

CRUD的Delete-刪除

Contoller (這邊就不解釋了)

image

View

image

image

後記

以上是一種實做CRUD的方式,但其實做法有很多種,譬如你也可自訂新增、編輯的View去實做,或者你也可以自訂一些查詢欄位POST到後端去,關於版面,如果要修改中文的顯示其實也可以做到,之後也會分享一些實做心得PO上來。而下一篇,預計完將後端改成用WebAPI + OData的方式實做 =V=

完成程式碼

Contoller

public class GridAjaxController : Controller
{
private NorthwindEntities db = new NorthwindEntities();

// GET: /GridAjax/
public ActionResult Index()
{
return View();
}

public JsonResult GetCustomer(KendoGridRequest request)
{
try
{
var result = db.Customers.ToList();
return Json(new KendoGrid<Customers>(request, result), JsonRequestBehavior.AllowGet);
}
catch (Exception)
{
Dictionary<string, object> error = new Dictionary<string, object>();
error.Add("ErrorCode", -1);
error.Add("ErrorMessage", "讀取資料失敗!");
return Json(error);
}
}

// GET: /GridAjax/Details/5
public ActionResult Details(string id)
{
if (id == null)
{
return new HttpStatusCodeResult(HttpStatusCode.BadRequest);
}
Customers customers = db.Customers.Find(id);
if (customers == null)
{
return HttpNotFound();
}
return View(customers);
}

// GET: /GridAjax/Create
public ActionResult Create()
{
return View();
}

[AcceptVerbs(HttpVerbs.Post)]
public JsonResult CreateCustomer(Customers customers)
{
if (ModelState.IsValid)
{
if (TryUpdateModel(customers))
{
db.Customers.Add(customers);
db.SaveChanges();
return Json("新增成功!!");
}
}
return Json("新增失敗!!");
}

public JsonResult EditCustomer(Customers customers)
{
if (ModelState.IsValid)
{
db.Entry(customers).State = EntityState.Modified;
if (TryUpdateModel(customers))
{
db.SaveChanges();
return Json("更新成功!!");
}
}
return Json("更新失敗!!");
}

[AcceptVerbs(HttpVerbs.Post)]
public JsonResult DeleteCustomer(string CustomerID)
{
Customers customers = db.Customers.Find(CustomerID);
db.Customers.Remove(customers);
if (TryUpdateModel(customers))
{
db.SaveChanges();
return Json("刪除成功!!");
}
return Json("刪除失敗!!");
}

protected override void Dispose(bool disposing)
{
if (disposing)
{
db.Dispose();
}
base.Dispose(disposing);
}
}

View

@model IEnumerable<KendoUI.Model.Customers>

@{
ViewBag.Title = "Index";
Layout = "~/Views/Shared/BaseLayoutPage.cshtml";
}

@section scripts
{
<script type="text/javascript">
$(function () {

//資料來源物件改用Ajax
var dataSrc = new kendo.data.DataSource({
transport: {
read: {
type: "POST",
url: "/GridAjax/GetCustomer",
dataType: "json",
complete: function (response, status) {
if (response.responseJSON.ErrorCode == -1) {
alert(response.responseJSON.ErrorMessage);
}
}

},
update: {
url: "/GridAjax/EditCustomer",
dataType: "json",
type: "POST",
complete: function (response, status) {
alert(response.responseJSON);
}
},
create: {
url: "/GridAjax/CreateCustomer",
dataType: "json",
type: "POST",
complete: function (response, status) {
alert(response.responseJSON);
}
},
destroy: {
url: "/GridAjax/DeleteCustomer",
dataType: "json",
type: "POST",
complete: function (response, status) {
alert(response.responseJSON);
}
},
},
schema: {
data: function (d) {
return d.data;
},
total: function (d) { return d.total; },
model: {
id: "CustomerID",
fields: {
product: { editable: false, nullable: false },
CompanyName: { validation: { required: true } },
ContactName: { validation: { required: true } },
City: { validation: { required: true } }
}
}
},
pageSize: 5,
serverPaging: true,
serverSorting: true
});

$("#gridData").kendoGrid({
dataSource: dataSrc,
columns: [
{ field: "CustomerID", title: "CustomerID" },
{ field: "CompanyName", title: "CompanyName" },
{ field: "ContactName", title: "ContactName" },
{ field: "City", title: "City" },
{ command: ["edit","destroy"], title: "&nbsp;", width: "160px" }
], //columns的field對應到customer資料表的欄位
sortable: true,
pageable: true,
filterable: true,
width: 800,
toolbar: ["create"],
editable: {
mode: "popup", //使用Popup的模式編輯資料
update: true, // 若設定為True,當按下Update才server資料
}
});
});
</script>
}
<div id="gridData"></div>


延伸閱讀


2013年12月25日 星期三

KendoUI & ASP.NET MVC系列文章 - 處理CRUD-使用Ajax讀取後端Model資料

前言

前兩篇為KendoUI基本的介紹,而此篇將會使用ASP.NET MVC來實做Ajax讀取資料。以下是本範例的環境:

Visual Studio 2013

ASP.NET MVC 5

Entity Framwork 6.0.2

北風資料庫(localdb)

以上逐一解釋就太佔篇幅了,將會整理一些學習資源於延伸閱讀裡

加入MVC的M (Model)

雖然新增一個MVC專案,就會將Model、View、Contoller三個資料夾拆分好,但實務上,因為Model通常會因為有複雜的關聯表或商業邏輯,所以通常即使是小專案,我還是會將Model變成是一個獨立的專案來處理。

在方案檔點選右鍵→新增專案
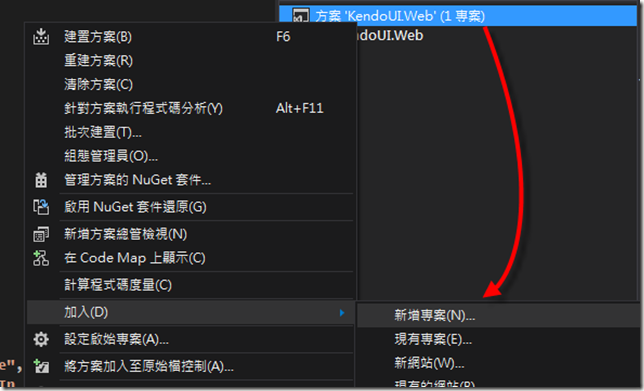
image

新增一個KendoUI.Model類別庫

image

在KendoUI.Model專案點右鍵,加入新項目,選擇ADO.NET實體資料模型
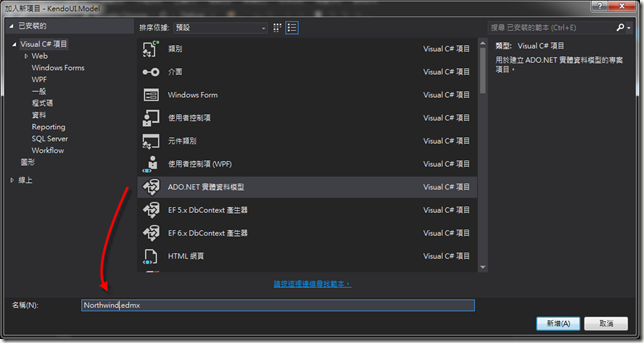
image

選擇從資料庫產生(這就是所謂的database first開發方式),而至於北風資料庫如何加到localDB,這邊就不多介紹了

image

選擇建立連線,輸入(localdb)\v11.0,並選擇已建好的資料庫

image

接著加入Customers資料表,本例將已此做Demo

image

接著我們回到Web專案,點選右鍵→加入參考,選擇我們的Model專案,接著整個方案Build一下,讓Web專案看得懂Model專案的class

image

加入MVC的C (Controller )

加入Contoller部分上一篇已經介紹過,而不同的是這次我們選擇自動新增view和基本的Entity Framework model

image

依照下圖,命名為GridAjax,資料來源為北風資料庫的Customers,還有載入上一篇所建置的layout(主要載入一些JQuery和KendoUI函式庫)

image 

新增完後會發現MVC已經幫我們建置好很陽春的Grid了

image 

而我們不需要用此陽春的Gird,再來就是將KendoUI Grid套用進去,我們先回到View,將內建產生的程式碼由以下程式碼替代,KendoUI Grid 的設置方式都不再多說,要注意的是,我們資料來源不再是像前一篇載入一個.js檔,而是用Ajax跟後端要資料。

@model IEnumerable<KendoUI.Model.Customers>

@{
ViewBag.Title = "Index";
Layout = "~/Views/Shared/BaseLayoutPage.cshtml";
}

@section scripts
{
<script type="text/javascript">
$(function () {
//資料來源物件改用Ajax
var dataSrc = new kendo.data.DataSource({
transport: {
read: {
type: "POST",
url: "/GridAjax/GetCustomer",
dataType: "json"
}
},
pageSize: 20,
serverPaging: true,
serverSorting: true
});

$("#gridData").kendoGrid({
dataSource: dataSrc,
columns: [
{ field: "CustomerID", title: "CustomerID" },
{ field: "CompanyName", title: "CompanyName" },
{ field: "ContactName", title: "ContactName" },
{ field: "City", title: "City" },
], //columns的field對應到customer資料表的欄位
sortable: true,
pageable: true,
filterable: true,
width: '800'
});
});
</script>
}
<div id="gridData"></div>

接著回到Contoller,預設是載入Index時就將Customers資料抓回來


image


但我們希望Grid是用Ajax的方式載入,故做以下小修改,先新增一個接收Ajax的function

private NorthwindEntities db = new NorthwindEntities();

// GET: /GridAjax/
public ActionResult Index()
{
return View();
}

public JsonResult GetCustomer()
{
var customers = db.Customers.ToList();
return Json(customers, JsonRequestBehavior.AllowGet);

}

這樣就很輕鬆的完成Gird繫結資料,但會發現這樣並沒有分頁的功能,所以我們接下來要實做
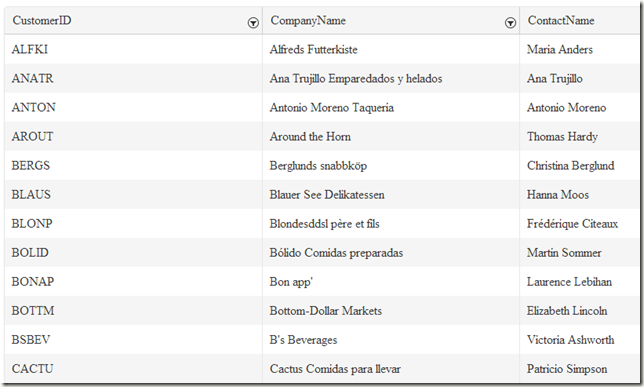

image


開啟偵錯模式,我們會發現POST過來的資料已有一些分頁的參數(take、skip、page、pagesize、sort),我們可以利用這些參數去進去分頁篩選或排序


image


但是其實不用這麼麻煩…有高手幫我們把這些事情都處理掉了!


首先再方案檔點右鍵,選擇管理Nuget套件,下載安裝KendoGridBinder


image


我們再將Contoller做以下修改,KendoGridRequest和Kendo這個類別就幫我們搞定了分頁排序等等功能

private NorthwindEntities db = new NorthwindEntities();

// GET: /GridAjax/
public ActionResult Index()
{
return View();
}

public JsonResult GetCustomer(KendoGridRequest request)
{
var result = db.Customers.ToList();
return Json(new KendoGrid<Customers>(request, result), JsonRequestBehavior.AllowGet);
}
而View我們增加以下schema的code,至於為什麼要增加此段呢?原因是因為KendoGridBinder這個套件回傳的JSON格式不太相同,他將所有資料放入一個名稱叫data的陣列,和回傳total的數字欄位
    var dataSrc = new kendo.data.DataSource({
transport: {
read: {
type: "POST",
url: "/GridAjax/GetCustomer",
dataType: "json"
}
},
schema: {
data: function (d) {
return d.data;
},
total: function (d) { return d.total; }
},
pageSize: 20,
serverPaging: true,
serverSorting: true
});

image


這樣就輕鬆完成一個多功能的Grid啦!!來看看執行結果吧


1.gif


後記


本篇會有點攏長,但希望用逐步的方式讓初學者能照步驟實做出來,如果對MVC已經相當熟悉的建議可以看黑暗大-在ASP.NET MVC 4中使用Kendo UI Grid 的文章,非常的簡潔明瞭!!


再來的幾篇我們將繼續完成新增、編輯、刪除功能!


延伸閱讀


如果對上列技術不太熟的,建議可以看看這些很棒的文章

mrkt 的程式學習筆記 - ASP.NET MVC 分層架構系列文
天空的垃圾場 – ASP.NET MVC系列文
[下載] 範例資料庫(含中文Northwind資料庫)
LocalDB:微软的新生代轻量级数据库-CSDN.NET
ASP.NET MVC 4 與 jqGrid 入門實作
Kendo UI API Reference